Showing posts with label Harvest Party. Show all posts

Thursday, October 24, 2013

Greens with Blackberries, Blueberries, Sugared Walnuts and Feta


Greens with Blackberries, Blueberries, Sugared Walnuts and Feta and Pink Poppy Seed Dressing
The summer my husband and I were married, we worked for the Forest Service in the Sawtooth Mountains of Idaho, up near Sun Valley.  I worked a second job at The Rocky Mountain Ranch, a rustic hotel/lodge nearby.  The chef at the restaurant served a lot of wonderful salads, which were topped with gorgeous berries, fragrant cheeses, sugared nuts and homemade dressings.   I was in heaven!  (And took lots of notes!)  I was totally inspired and came away with a whole new approach to salad!  "Say goodbye to tomatoes and carrots and say hello to berries!"  To this day berries, fruits, nuts and cheeses are the first thing I think of throwing on a salad.  If you have children who hate salads...forget the tomatoes and cucumbers and add some favorite seasonal berries, and the Poppy Seed Dressing!  It works every time! We enjoyed this salad at the Harvest Party.
Wash and dry an assortments of lettuces and place on a platter
8 ounces blueberries
8 ounces blackberries
1/3 cup crumbled feta
1/2 cup walnuts (see recipe below)
Poppy Seed Dressing (see recipe below)


                        Sugared Walnuts

            My friend Dena Duncan shared her recipe for these sugared walnuts.  I double the recipe so I have plenty on hand to toss on last minute salads.  These are fabulous on salads but be sure to make plenty of them because people can’t resist snacking on them too!

2 cups walnut halves
6 tablespoons sugar
¼ teaspoons salt
1 tablespoons canola oil

In small pot bring 4 cups of water to boil. Stir in nuts.  Remove from heat. Let sit 3 minutes. Drain and dry with paper towel.  Mix sugar and salt in a bowl and toss with hot nuts. Add oil to nuts and stir. Spread on baking sheet in a single layer.  Allow to dry for one hour.  Bake at 350 until golden brown, approximately 10-12 minutes.   Remove from oven and toss nuts on baking sheet with spatula to loosen nuts from pan. Cool.  When cool and dry toss on top of your salad just before serving.  Store remaining nuts in an air- tight container.                       


 Pink Poppy Seed Dressing
½ cup red wine vinegar
½ cup sugar
1/3 cup canola oil
1 ½ teaspoons salt
¼ teaspoons garlic powder
¼ teaspoons pepper
1 teaspoon poppy seeds

Place all ingredients in blender and blend until smooth. Refrigerate.

Tuesday, October 22, 2013

Harvest Party and Roasted Lemon Chicken

To kick off our blogs my dear friend Tracy Laverty and I threw a Harvest Party for our families.


Everyone helped set the table.


Delicious food  and good laughs.


Roasted Lemon Chicken

I love serving this chicken alongside Fresh Beans with Bacon and Potatoes and Sage.  It’s just so down to earth delicious.


4 bone in and skin on chicken breasts halves
1 lb. small red or yellow new potatoes quartered
½ cup fresh squeezed lemon juice
4 tablespoons olive oil
2 cloves garlic minced
2 handful fresh chopped herb sage, thyme, rosemary, parsley 
salt and fresh ground pepper to taste
2 tablespoons Panko bread crumbs

Arrange chicken skin side down in a baking dish.  In small bowl whisk together lemon juice, olive oil, garlic, herbs, salt and pepper. Pour over chicken and let stand 1 hour. Preheat oven to 400 degrees. Roast chicken for 30 minutes.   Turn pieces skin side up.  Sprinkle breadcrumbs over the chicken and roast until browned, and juices run clear. Another 30-45 minutes.  Transfer chicken to serving platter and cover loosely with foil and keep warm until serving.  If pan juices have mostly dried up, pour some chicken broth, water or cream into pan.  Add a little olive oil.  With whisk loosen browned bits and stir into sauce.  Pour juices over chicken and serve.


Baguettes


Baguettes
When I found my grandma’s baguette pans and recipe several years ago I decided I’d make a go at making them.   After all who doesn’t love a hot baguette right out of the oven?   My husband has many fond memories of buying fresh, hot baguettes for lunch in France and devouring it while riding home on his bike.   Baguettes are made with basic ingredients and go alongside just about everything. You can freeze what you don’t eat and reheat for another meal.  You can bake this bread on a baking sheet (lined with parchment paper) or use a round casserole dish (with ¼ inch of corn meal on bottom) or in baguette pans found at any baking store.  
2 tablespoons sugar
1 tablespoon salt
2 ¼ teaspoon dry yeast or 1 package
2 ½ cups warm water
6 –7 cups flour
In large bowl stir sugar, salt, yeast and water until dissolved.  Stir in 5 cups flour, until more or less mixed. Add one more cup of flour and mix. Dough will be a sticky, gooey dough. Pour out onto floured surface. Take last cup of flour and knead into dough over the next ten minutes. After 10 minutes of kneading you will have a beautiful dough. Grease the bowl with shortening and place dough ball in bowl and roll around to cover with shortening, to prevent dough from drying out.  Cover bowl with wet dish cloth and let rise 1 ½ hours, or until almost doubled in bulk. Punch down and grease bread pans well with shortening. Pour dough out onto clean surface, no flour needed, with knife slice off 4 equal pieces of dough.  Roll dough into long equal ropes, 1 inch shorter than length of bread pan. Lay in bread pans or on greased baking sheets sprinkled with corn meal. ( You can also bake the dough in two round covered casserole dishes, greased and dusted with a ¼ inch layer of corn meal on the bottom of dish.)  Make three slashes across tops of bread.  Lightly beat 1 egg white and brush dough with egg white over entire surface.  Allow to rise until doubled in a cooler location.  Make three 1/8 inch slashes across bread and bake in 400 degree oven for 15 minutes. Bake at 350 degrees for 30 minutes, or until browned.  Remove from pans and allow to cool.  Freeze any uneaten bread in foil. Reheat bread still wrapped in foil in 350 degree oven for 30 minutes. 


Baguette pans


Monday, October 21, 2013

Herb Country Bread


Herb Country Bread
This bread is SO delicious and SO easy!  Even if you have never made homemade bread before!  ESPECIALLY if you have never made homemade bread before!  Be creative and roll the top of the dough in a garnish that will give your bread a special touch. You can roll the top of the dough in poppy seeds, sesame seeds, a variety of grated cheese, chopped olives, you get the idea.    
        
2 ½ teaspoons dry yeast or 1 package

2 cups warm water

1 tablespoon sugar

2 teaspoon salt

4 cups flour

2 handfuls of fresh sage, rosemary, thyme and parsley or other favorite garden herbs, chopped

Oil two 9 inch round cake pans or one large baking sheet.  Dust with corn meal and set aside.  In a large bowl mix, yeast, sugar, and salt with warm water and stir until dissolved.  Add flour and stir until blended.  Do not knead.  Cover and let rise one hour or until doubled.  Chop herbs and spread out on counter top.  Flour hands and divide dough into two equal portions.  Roll top of dough in herbs and place on prepared baking sheet or in cake pan.    Cut four slices in a square shape on top of dough.  Brush with egg white and sprinkle with coarse salt.  Let rise 1 hour or until doubled.  Bake at 425 degrees for 10 minutes.  Lower temperature to 375 degrees and bake another 15 minutes.  Remove from oven and brush with butter. 

Wednesday, October 16, 2013

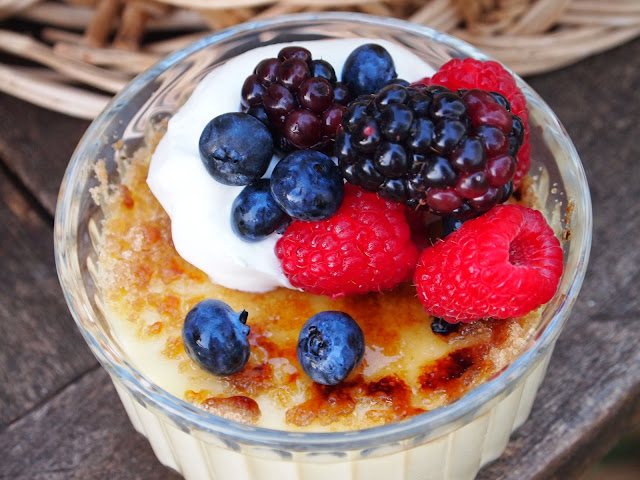
Creme Bruele with Berries and Whipped Cream


Crème Brulee with Berries and Whipped Cream

Crème Brulee is one of the easiest, most elegant and delicious deserts available to mankind.  Seriously.  Another reason it makes a great desert for a party is the fact that you can make it a day in advance of the event.  After baking the crème brulee and cooling it, place ramekin in a small zip lock bag or cover with plastic wrap and refrigerate.  Before serving, top each creme brulee with brown sugar and brown under broiler or torch with a hand held torch.  ( Your husband will love acting as soux chef for the torching!) I picked up a little hand held torch from Williams-Sonoma for this purpose.  Don't be intimidated by the French!  You can do this!
This is my husband’s ultimate dessert.  He asks for crème brulee for his birthday every year.   Topping the crème brulee with sweetened whipped cream and fresh berries makes a delightful presentation. This was our dessert at the Harvest party.


4 cups heavy cream

1 tablespoon pure vanilla extract

8 egg yolks

¾ cup plus 2 tablespoons  granulated sugar

Garnish with:

extra brown sugar, 1 tablespoon per ramekin

2 cups whipping cream, whipped and sweetened

fresh strawberries, raspberries, blueberries, blackberries, boysenberries 

Preheat oven to 300 degrees.  Place 8-12 ramekins ( you may be able to get more or less out of the recipe depending on the size of your ramekins) in a roasting pan. I like to use a small ramekin, because the dessert is so rich.  In a saucepan over medium heat, combine cream, vanilla and salt.  Warm for 5 minutes.  In a large bowl, mix egg yolks and granulated sugar. Pour hot cream into egg mixture and whisk together.  Strain mixture into a pitcher.  Skim bubbles off cream mixture.  Pour into ramekins and fill to 1/2 inch bellow the rim.  Place roasting pan in oven and fill roasting pan with water reaching halfway up around the ramekins.  Loosely cover with aluminum foil. Bake for 1 hour and 15 minutes or until set. Remove ramekins and cool.  At this point, cover with plastic wrap and refrigerate overnight if making a day ahead. Before serving, place 1 tablespoon of brown sugar on top of each crème brulee and spread to cover the top. Place ramekins on a baking sheet.  Turn oven on Broil and broil crème brulee for 30 seconds to 1 minute or until nicely browned.  Or use a hand held torch to brown the sugar, until browned and bubbly.  Top each creme brulee with a large dollop of sweetened whipped cream and top with an assortment of fresh berries. Serve cold or bring to room temperature before garnishing.


Saturday, October 12, 2013

Frozen Pumpkin Custard


Frozen Pumpkin Custard
I Love the frozen custard from Nielsen's Frozen Custard in Salt Lake City, Utah and wanted to make some for our Harvest Party with friends.  And it's just that time of year...we all want pumpkin everything!  Frozen Pumpkin Custard would be perfect. I started with a plain frozen yogurt recipe and added the pumpkin and spices.  It's got a great frozen yogurt flavor, tart and sweet!  I had my eye on a waffle cone press at Williams and Sonoma all summer long...and finally bought one so I could make a homemade waffle cone to serve the frozen custard in.  Williams and Sonoma had these adorable little wooden ice cream spoons to go with it...couldn't resist buying those as well!  The cones turned out delicious!  And since I made the cones and custard a day in advance, serving the custard in the homemade cones was simple and delicious.  And I love the fact that there were no broken cones from boxes to despair over!     

1 cup sugar
1 tablespoon lemon juice
3 tablespoons water
pinch salt
1 tablespoon vanilla
2 egg yolks
1/4 cup corn syrup
32 ounces plain whole-milk yogurt
1/4 cup heavy cream
2 cups pumpkin puree
1 cup sugar
1 teaspoon cinnamon
1 teaspoon nutmeg

Bring sugar, lemon juice and water to a boil and stir until sugar is dissolved.  Remove from heat and add vanilla.  In a large bowl, whisk egg yolks until combined.  In a slow steady stream, pour hot syrup into egg yolks, whisking constantly.  Stir in corn syrup, yogurt and cream.  In small pot stir pumpkin, sugar, cinnamon and nutmeg and heat for a few minutes.  Stir into yogurt mixture.  Cover and chill in refrigerator for a few hours until completely cool.  Pour into ice cream maker and freeze according to accordingly.  Scoop frozen custard into freezer proof plastic container and freezer until ready to serve.

Wednesday, October 9, 2013

Caramelized French Onion Soup

Caramelized French Onion Soup


 I think I ordered French Onion Soup for lunch at almost every restaurant we visited in France’s Loire Valley and in Paris.  It’s definitely one of my very favorite soups on any menu.  The thin broth with soft and buttery onions and with crisp, crusty bread and molten Gruyere…it’s enough to make anyone crave a trip to France.  Better yet, enjoy this homemade version in the warmth of your own home, around your own kitchen table with a group of people you love.   This is super easy and pretty fast.  The only hard part is crying like a baby when cutting all those onions!  My trick?  Find a pair of ski or swim goggles to wear while you cut the onions!   You may look hilarious, but at least you won't cry!

3 tablespoons butter
1 tablespoon olive oil
3 large yellow onions, thinly sliced
3 cloves garlic, thinly sliced
2 teaspoons salt
1 teaspoon dry mustard
½ teaspoon pepper
Small handful fresh thyme, strip leaves off stem with fingertips
8 cups water
8 cubes beef bouillon or teaspoons of granules
4 tablespoons soy sauce
loaf French bread, sliced, buttered and sprinkled with garlic salt, toasted under broiler
deli sliced Swiss or Gruyere cheese

Preheat oven to 425 degrees.  On a large rimmed baking sheet melt butter and olive oil in preheating oven.  Toss onions and garlic in melted butter.  Mix salt, dry mustard, pepper and fresh thyme together and toss with onions.   Roast for 25-30 minutes, tossing a few times throughout.   Bring water, bouillon and soy sauce to a simmer. Add onions and simmer for 5 minutes.  Adjust seasonings.  Ladle into oven proof bowls. Top with piece of French bread, then lay a slice of cheese over bread.  Place bowls under broiler and watch closely until cheese melts.


Monday, October 7, 2013

Sea Salted Caramel Apples


Sea Salted Caramel Apples


I love caramel apples.  Who doesn't?  They make the perfect Fall treat and gift. I had my eye on some hand dipped gourmet caramel apples in a favorite chocolate store in historic Frederick, Maryland the other day. But the 10 dollar price tag for one apple is pretty steep, especially when you need several.  Plus it's a lot more fun to "DIY"!  I made these for a 'Harvest Dinner Party' we had with friends the other day.  These are really simple and taste and look fantastic.  No store bought caramels to unwrap!  I made a simple homemade caramel with staples you should have on hand.  Yes, you will need a candy thermometer.  If you don't have one, GET one!  You can get them almost any good grocery store, but at any great kitchen store as well.  You'll use it for all kinds of yummy things, I promise!  These apples make adorable place tag holders, not to mention great gifts and party favors. 

10 small Granny Smith apples
10 wooden caramel apple dowels (I buy these in bulk)
2 pounds milk chocolate
coarse sea salt

Stick wooden caramel apples dowels into tops of 10 small tart crisp apples.  In a smaller crock pot, heat milk chocolate on the "warm" setting.  If chocolate needs to be thinned a little for dipping, stir 2-4 tablespoons vegetable shortening into the chocolate.  Stir occasionally while you make the caramel. 

Caramel:
3/4 cup sugar
3/4 cup brown sugar
1/2 cup corn syrup
1/2 cup water
1 teaspoon vinegar
1/4 teaspoon salt
3/4 cup butter

Chocolate:
11 ounces quality milk chocolate chips
2 tablespoons vegetable shortening

Prepare a flat baking sheet or platter with parchment paper and set aside.  In small but heavy pot, combine sugars, corn syrup, water, vinegar and salt.  Bring mixture to a boil over medium heat.  Cook to 235 degrees.  Whisk in butter and bring to a boil again.  Boil gently until caramel reaches 245 degrees.  Remove from heat.  Let stand a minute.  Take hold of the apples by the stick and roll apples on their sides through the caramel. Or use a spoon to pour caramel over the top of the apples.  You may need to use both dipping methods to cover apples.  You don't have to completely cover the top of the apples with the caramel.  It's fun to see some green apple showing through too.  Scrape off excess caramel from bottom of apple with a spoon.  Place caramel apple on parchment paper.  Refrigerate for 30 minutes or until caramel is set.

In small sauce pan on lowest heat possible, melt chocolate chips and shortening while stirring constantly.  This will just take a few minutes.  Have a small bowl of coarse sea salt ready.  Dip caramel apples in melted chocolate by rolling the sides of the apples through the chocolate. Scrape excess chocolate off the bottom of apples with a spoon. Set on a tray lined with  parchment paper.  Sprinkle fresh chocolate dipped apples immediately with a little coarse sea salt.  Allow to set in a very cool location until set and ready to wrap or eat.


Blog Design by Caked Designs